
Step 1
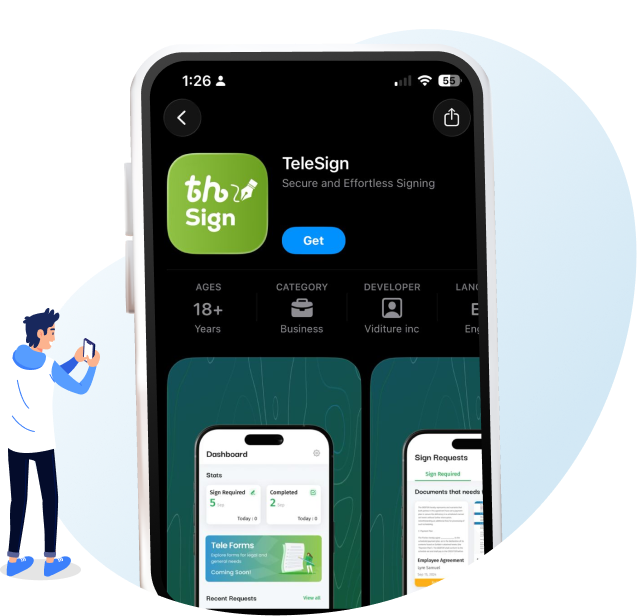
Download Telesign App
Download and install the TeleSign Mobile App on your smartphone, available for both Android and iOS.
Step 2
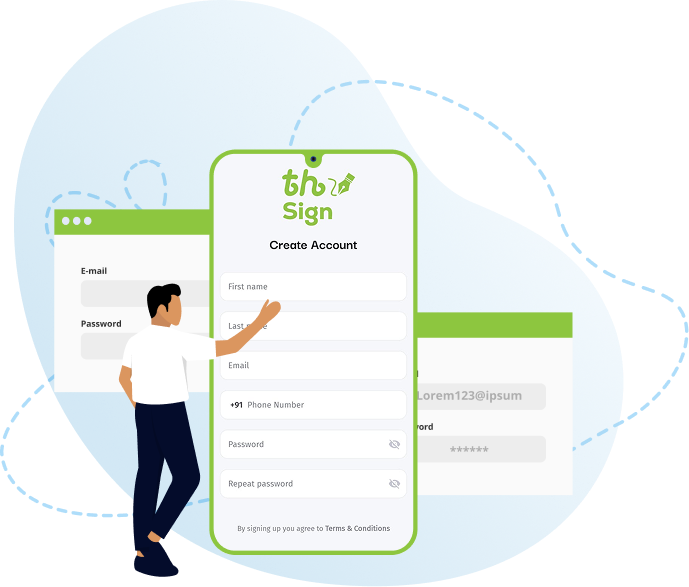
Create Account
After downloading the TeleSign app, create your account by entering your first and last name, phone number, email address, and a strong password. Once you agree to the terms and conditions, your account will be successfully created and ready to use.
Step 3
Form Selection
Once your account is created, you will gain access to your personal dashboard. From there, click on the TeleSign Form option. Upon selection, you will be provided with different categories of forms. Choose the 'Federal Government Forms' category, and from the available list, select the 'Federal Government Forms’

Step 4
DARS Services
In the Federal Government Forms section, choose Document Authentication Registration Service from the available options.

Step 5
Select Form
After selecting Document Authentication and Registration Services, you will be directed to two forms: Power of Attorney Certification and Power of Attorney Revocation. When you click on the Power of Attorney Certifications option, you will be redirected to the Form Information page. Here, you will find all relevant details, including the form type, category, sub-category, purpose, approval flow, and applicable charges. By clicking “Start Signing”, you will proceed to the next step in the process.

Step 6
User Verification
Select your nationality by choosing Ethiopian Citizen or Foreign National, then click Continue. Once your nationality is selected, enter your Fayda Digital ID (FAN number). Click Get a Code to receive an OTP on your mobile phone, then enter the code in the provided field then click submit button. Step 15

Step 7
POA Type
From the available options, select the Power of Attorney type you want to issue General Administrative, Family Administrative, or Attorney POA

Step 8
Applicant Details
Once the Power of Attorney type is selected, the Principal Information screen will be displayed. Select the principal type Individual, Sub-Agent, Corporate, or Legal Guardian. Enter an email address if available (this field is optional). Gender & address details will be automatically populated from Fayda, as the system is integrated with Fayda. Enter your home address, then click Continue. If there is an additional principal, select Add Secondary Principal and provide the required details in the same way as the primary principal, including the relationship to the primary principal.

Step 9
Agent Info
Enter the agent details. First, select the agent type (Individual or Corporate). Then provide the title, full name, phone number, & email address (the email field is optional). Click Continue to proceed. To add an additional agent, select Add Another Agent. A secondary agent section will appear enter the required details and click Continue again.

Step 10
Authority Type
Select the type of power to be granted to the agent by choosing Personal Matters or Corporate Matters.

Step 11
Authority Options
After selecting Personal Matters or Corporate Matters, choose the specific powers you want to grant. Turn on the toggle for each required power, then click Continue. You may enable as many powers as needed.

Step 12
Custom Authority
After completing your selections, the number of selected powers will be displayed. To add a custom power, select Add Your Own Power, choose a power category, and enter the power description. Then click continue .
Step 13
Duration Setup
Next, enter the effective and termination dates. For the effective date, choose either When I sign it or On a certain date. For the termination date, select On a certain date or Until I revoke. When choosing a certain date, note that date limitations may apply. If you select Until I revoke, the Power of Attorney will remain valid until you remove the granted powers from the agent. After selecting the appropriate options, click Continue.

Step 14
Review Application
All the information you provide in the questions and answers form will be generated into a PDF and displayed on your screen for review. If any corrections are needed, you may click the “Back Button” to update your details. Once everything is accurate, select the ‘I agree to the Terms and Conditions’ checkbox and then click the ‘Start’ button to proceed.

Step 15
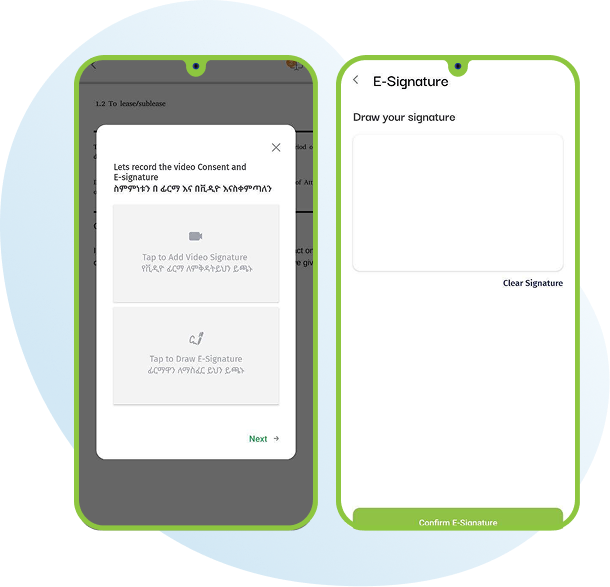
Video Signature & E-Signature
After clicking the “Start” button, you will be redirected to the Video Consent and E-Signature screen. Tap “Add Video Signature.” A pop-up message will request permission to access your microphone click “Allow,” then select “OK.” Carefully read the on-screen instructions and click “OK, I Got This.” A note will appear on your screen in both English and Amharic. Choose your preferred language, then click the red button at the bottom to begin recording your video while reading the note. (Please ensure you read for at least 5 seconds.) Once the .recording is complete, you may either click “Retake” to record again or “Next” to proceed.
Step 16
Document Preview
A confirmation message will appear stating: “All fields are completed successfully.” Next, click the “Preview” button to view your completed PDF. Review all the details carefully to ensure accuracy. Once confirmed, click the “Continue” button.

Step 17
Payment Details
In the Payment section, you will see a complete summary of your charges, including the total amount. then Click the “Pay Now” button to proceed to the Order Details page You can add any remarks in the Special Note field if needed; this step is optional.
