
Step 1
Download CBE Docs Mobile App
Download and install the CBE Docs Mobile App on your smartphone, available for both Android and iOS.
Step 2
Open the App
After completing the download, proceed to open the application.
Step 3
Select Language
Upon opening the application, select your preferred language.

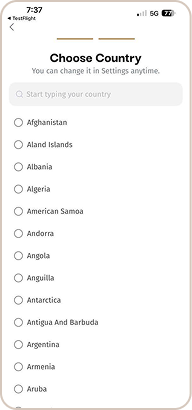
Step 4
Choose Country
After selecting your language preference, choose your country of residence.
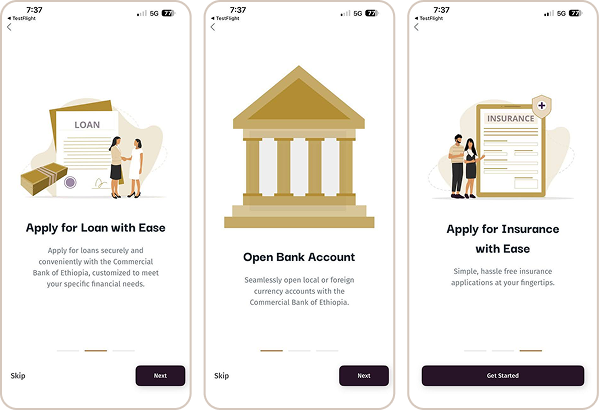
Step 5
Get Started
Click Next and choose Get Started or select Skip to move past this section.
Step 6
Create Account
Once the login dashboard is displayed, you need to register before logging in. Select Create an Account to proceed.

Step 7
Enter Details
Create your account by entering your first name, last name, phone number, email address, and a strong password. After agreeing to the terms and conditions, click Create Account.

Step 8
Login & Dashboard
To verify your phone number, click Send Code. An OTP will be sent to your registered number enter it and select Submit to proceed.

Step 9
9.Login & Dashboard
Once your account is created and logging in with your username and password, you will gain access to your personal dashboard. From there, click on the CBE Forms option.

Step 10
Select Form Type
When you click on CBE Forms , you will be redirected to the Form Information page. Here, you will find all relevant details, including the form type and approval flow. By clicking “Let’s Start”, you will proceed to the next step in the process.

Step 11
Select Form Type
From the available options, select the form you wish to apply for, such as bank account opening, account-to-account transfer, or RTGS transfer.

Step 12
Verify Location
If you select the account opening form, you’ll first need to verify your location by choosing your country of residence. The requirements vary depending on the country you select.

Step 13
Enter Fayda ID
After selecting your country, if you choose Ethiopia, you’ll be required to enter your Fayda Digital ID (FAN number). Tap Get a Code to receive an OTP on your mobile phone, enter the code in the provided field, and then click Submit.

Step 14
Customer Type
if you live in Ethiopia and want to open an account, you’ll first be asked whether you’re a new customer or an existing one. Select the option that applies to you and tap Continue to move to the next step

Step 15
Select Currency & Branch
Next, select the type of currency account you want to open and the branch type where you would like to open the account.

Step 16
Choose Account Type
Next, select the type of account you want to open from the list of available account types.

Step 17
Choose Account Type
Every account have its own attribute , if you would like a checking /saving account under that there are different accounts and from those you can pick one and proceed with the next inquires and if the account type isn’t there you can click add more account types button and write the account type you would like to open.

Step 18
Account Attributes
Next, you’ll land on the application details page. Please fill in all the required details to continue.

Step 19
Fill Application Details
In the identity details section, your Fayda ID (FAN) will be filled in automatically. Please enter your title, first, middle, and last name, and phone number. Providing an email address is optional.

Step 20
Add Personal Details
Next, you’ll reach the personal details page. Please provide your date of birth, city, and gender, as well as additional information like marital status, languages spoken, educational background, communication preferences, blood type, and other details.

Step 21
Address & Financial Info
On the additional details page, you’ll be asked if you are a politically exposed person (PEP). If yes, you’ll need to provide extra details. U.S. citizens will be prompted to enter their SSN and GIIN. If this doesn’t apply to you, just select No and continue.

Step 22
Address & Financial Info
Please provide your address details and financial information to continue.

Step 23
Bank Info
Please provide your address details and financial information to continue.

Step 24
Upload Verification Photo
During the verification step, you’ll be asked to upload a photo from your files or take a picture directly using your phone’s camera.

Step 25
Select Services
Then, choose the services you want from the list by turning on the corresponding toggles.

Step 26
Confirm Details
Once all the required information is confirmed, you’ll see a green check mark. Click Next to proceed to the next page

Step 27
Review PDF
All the information you provide in the questions and answers form will be generated into a PDF and displayed on your screen for review. If any corrections are needed, you may click the “Back Button” to update your details. Once everything is accurate, select the ‘I agree to the Terms and Conditions’ checkbox and then click the ‘Start’ button to proceed.

Step 28
Video Consent
After clicking the “Start” button, you will be redirected to the Video Consent and E-Signature screen. Tap “Add Video Signature.” A pop-up message will request permission to access your microphone click “Allow,” then select “OK.” Carefully read the on-screen instructions and click “OK, I Got This.” A note will appear on your screen in both English and Amharic. Choose your preferred language, then click the red button at the bottom to begin recording your video while reading the note. (Please ensure you read for at least 5 seconds.) Once the .recording is complete, you may either click “Retake” to record again or “Next” to proceed.

Step 29
E-Signature
You will then be directed to the E-Signature screen. Here, draw your e-signature in the designated area. If needed, click “Clear E-Signature” to redraw. When satisfied, click “Confirm E-Signature.” Then your screen will display both the Video Consent and the E-Signature. Click “Next” to continue.

Step 30
Preview & Confirm
A confirmation message will appear stating: “All fields are completed successfully.” Next, click the “Preview” button to view your completed PDF. Review all the details carefully to ensure accuracy. Once confirmed, click the “Continue” button.

Step 31
ID Verification
Once you submit your documents, your Fayda ID will be matched with your video consent, and you’ll receive a similarity index score.

Step 32
Final Confirmation
A pop-up will appear asking you to confirm that everything is complete. Once you tap Yes, you’ll receive a success message with your application reference and the estimated processing time

Step 33
Change Language
To change your language preference, first click the Settings icon in the top-right corner to open the Settings section, then select Language. You will be redirected to a new page where you can choose your preferred language. After clicking the Save button, your language preference will be updated successfully.

Step 34
Change Country
To change your country, first click the Settings icon in the top-right corner to open the Settings section, then select Country. You will be redirected to a new page where you can choose your preferred country. After clicking the Save button, your country preference will be updated successfully.

Step 35
Change Password
To change your country, first click the Settings icon in the top-right corner to open the Settings section, then select Change password . You will be redirected to a new page where you can choose your preferred country. After clicking the Save button, your country preference will be updated successfully.

Step 36
Verify Email
To verify your email, first click the Settings icon in the top-right corner to open the Settings section, then select Verify Email. You will be redirected to a new page where a verification link or code will be sent to your email address. Open your email, follow the verification link (or enter the code), and once completed, your email will be verified successfully.

Step 37
View My Forms
On the bottom-right corner, click the My Forms button to view all the forms you have submitted. You will find Incomplete forms that you can continue from where you stopped, Submitted forms that have been fully sent to the officer, In Revision forms that are being reviewed or revised by the officer, and Approved forms that have been fully approved by the officer.

Step 38
Notifications
Notifications: - Upon successful submission, you will receive confirmation through SMS, WhatsApp, and email notifying you that your application has been successfully submitted.
Step 39
Final Document
Final Document: - Following submission, your application will be reviewed by a Document Authentication Registration service officer. If revisions are required, you will receive a revision link via email. If your application is rejected, you will be notified with the reason for rejection. After approval, you will be notified by email, SMS, and WhatsApp, and you may then print the final document for use.